Showing posts with label Google Slides. Show all posts

Monday, October 5, 2020

Using Vocabulary Know-It Boards as a Formative - Google Slides Manipulatives

As I continue to embark on this hybrid environment of teaching both digital and in-person students simultaneously, I am learning how important formative assessments and observations are in informing me as the teacher how to proceed when for most students I cannot physically witness their progress. My colleague Rachel Ash introduced me to Google Slide manipulatives, and she has demonstrated a way in which students can let me know how well they know their vocabulary: Vocabulary Know-It Boards (look for the specific activity on the page - you can actually make a copy for yourself from her example).

Essentially, from the list of 25ish provided words, students will drag the word to the quadrant which best describes their knowledge of the word: I Really Know It, I Know It, I Kind of Know It, I Don't Know It.

Student Examples:


Observations

  1. This is a really easy way for students to "check-in" with me about what they feel like they know and what they do not know.
  2. The downside of this is that the vocabulary words are presented in isolation, so in some ways, it may be that students actually do know the words when they see them in context but in isolation, they do not.
  3. Using Google Classroom, this is so easy to assign, because I just "Make a Copy for Each Student" and then they can "Turn It In" when finished.
  4. I do manually tally what words are most commonly being placed in the "I Kind of Know" and "I Don't Know" quadrants. These become the words which I target.
  5. I do make this an assignment for students to ensure that I receive feedback from every student, but I also give them a 100 as a completion grade.
  6. I do this assignment every 3-4 weeks to see what students feel like they know and what they feel like they do not know.

Tuesday, September 29, 2020

Multiple Stories - Put the Sentences in Order - Google Slides Manipulatives

I am continuing to experiment with Google Slides manipulatives, and here is another activity which i was able to adapt to a digital environment. It is Multiple Stories - Put the Sentences in Order but now converted to an individual virtual assignment (see my blog post about how to create Google Slide manipulatives). 

Due to teaching hybrid classes in this weird digital environment, I have being going deliberately slow and almost painfully overdoing the amount of repetitions of stories in different ways to increase vocabulary and language structure exposure for students. An activity like this allowed for me to consolidate the stories into one assignment as a review. Below is a picture of what the assignment looked like for students - it is based on two Movie Talks and an ongoing story about Augustus (can you tell that I have to introduce war-related, imperial vocabulary this year?):


Observations

  1. I love that in Google Classroom, I can assign this as a copy for every student and that when students submit it, I can immediately correct the assignment and then return it with comments.
  2. Again, this is a great higher-order thinking activity, because it forces students to distinguish which sentence is for each story and then to determine the correct order of the sentences.
  3. The "draggable" nature of the assignment lends to its novelty and definitely appeals to tactile learners.
  4. Students did quite well on this, so from a formative perspective, this let me know that they were ready to move onto new vocabulary.
  5. This is a great assignment for an asynchronous learning day (if you are able to do those)!

Thursday, September 10, 2020

Digital Pictionary Dictionary

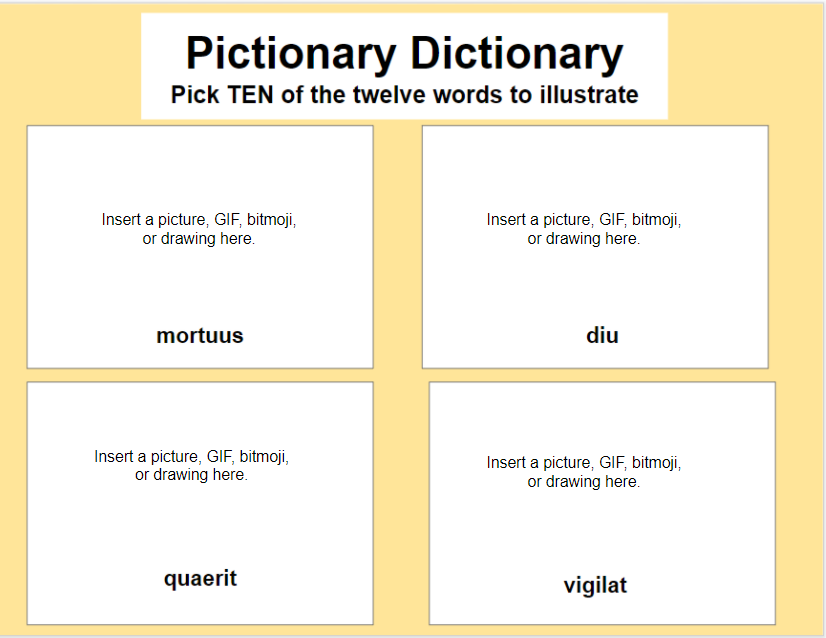
Here is another use of a manipulative using Google Slides which I have learned about recently: the Digital Pictionary Dictionary. Pre-Covid, I would have students hand-illustrate 15-20 vocabulary words as an intrapersonal review of words which we had been targeting. Students liked it because it was an easy classroom activity which they could do in-class on their own at their own pace, and I certainly enjoyed the break from teaching on those days. Now that we are teaching in a digital format (even if in-person, I am refraining from using traditional pen/paper methods as much as possible), this activity can easily be adapted to an electronic setting. It does take a bit of preparation on your end.

Creation of Template
  1. Pick twelve vocabulary words which you wish to target or to review. 
  2. Create a manipulative Google Slides template like below (see post here about creating manipulatives). I overlay the "Insert a picture, GIF, bitmoji, or drawing here" and not as part of the background template so that students can delete this. Below is an example of a template which I created based on words which students informed me that they "kind of knew/did not know" from last year


Assignment
  1. Students are to find digital images of TEN of twelve vocabulary words, whether it be pictures, GIFs, bitmojis, memes, or drawings, and to insert them on the template.
  2. I assign this on Google Classroom so that each student has a copy of the template to manipulate. As a result of using Google Classroom, they can also turn it in electronically.
Observations
  1. Although there is some time spent on creating the template on my end, I love the creativity of students in their choice of digital images. While many are just doing a Google image search of vocabulary words and then just cutting/pasting the first image they find, many are actually taking their time to personalize their images. From an instructional technology standpoint, personalization is a very high-level demonstration of critical thinking and creativity! Below are some examples where students created themes of images as a demonstration of personalization:


2.    Allowing students to use digital images such as GIFs, memes, emojis, bitmojis, etc., 
       gives students the opportunity to use tools with which they are familiar and to apply in 
       different ways. 

Thursday, August 27, 2020

Conducting a Live Movie Talk via Zoom

I am a huge fan of doing Movie Talks, because I feel that they are a great way to preview vocabulary and language structures prior to a targeted reading. As much as students will complain about me stopping the movie clip to narrate it and to ask questions, when we go over the actual reading of the movie clip in various ways, they actually like the fact that they have a visual image in their heads of the passage already and know what to expect. However, in the digital learning classroom environment, the question for me has been "What is the most effective way to conduct a Movie Talk via a Zoom session (or Google Meet, Microsoft Team, etc) with a class of 25-30 students? Is it even possible?"

The answer is both yes and no. Yes, it is possible to conduct a live Movie Talk via Zoom, but in some ways, it is going to be different from how students fully experience it in the physical classroom. There are going to be some aspects which are identical to a classroom usage, but at the same time, there are other aspects which you will have to sacrifice and therefore will have to address in other ways.

The way in which I conducted a Movie Talk via Zoom was through the use of Google Slides. Now this is actually not a new concept at all, because I know of many teachers who have been using Google Slides for Movie Talks for years. When I created the Movie Talk Google Slide, I actually liked the layout very much, because everything which students and I needed was there on the slide itself. The layout of the slide was very basic and only had the list of target words and the video clip itself (directions for inserting videos into Google Slides). Below is my actual Google Slide for the Movie Talk (it is an active Google Slide, so you can push/play pause to see how it works):


I used the screen sharing function so that students could view it on their computer or device. 

Observations
  1. Asking questions and having students respond back and forth does not work too well in a Zoom session. I tried doing this, but since students were already muted, it took too much time for students to unmute themselves and to respond. As a result, it ended up being more of a Story Listening experience. I guess you could make it like Dora the Explorer by asking a question, pausing, and then answering it yourself.
  2. Having the target words on the slides is very helpful, and if you set the cursor for "laser," it helps draw attention to which word you're pointing and pausing at.
  3. Because I was not asking questions, I repeated the sentence an overly amount and used different variations of sentences using the target words to get in repetitions. At the same time, sentences need to be simple and short and full of repetitions with pointing and pausing to work in this environment.
  4. Whenever I pointed and paused at a target word using the laser pointer function, I truly had to pause and count to 4 in order to allow for student processing.
  5. In many ways, you are talking into the nethers. I found myself talking extra slowly and self-defining a lot of words as I went along to ensure that students were understanding. 
  6. I had A LOT of screens and tabs open for this (Zoom, Google slides). This made it kind of tricky at times.
  7. if possible, use the chat function for student comprehension check. They can enter in a number of 1-5 letting you know their comprehension level. Make sure it is set only to "Communicate with host." At the same time, depending on how many tabs/windows you have open, it may be too much.
  8. I would set "students cannot unmute themselves" during this, because I had a student who kept sneezing and there was a lot of background noise from students who were unmuted.
  9. This took about 25-30 minutes - maybe too long for a Zoom session, since it was just a listening activity? I told students get comfortable before we did this.
  10. My colleague John Foulk suggested that we use Google Slides for doing Movie Talks when students return face-to-face again. I tried it out by projecting it onto my classroom screen, and I really liked having everything there that I needed on the one slide. 
How is your Movie Talk experience going in a digital environment?

Sunday, August 23, 2020

Creating Manipulatives Using Google Slides - Picture Sentence Matching

School has now been back in session for 1.5 weeks (albeit virtually), and my technology goal for this year is to learn Google Classroom. Even though my district uses the Brightspace learning management system (with which I am familiar using it as a grad student so I understand the student perspective), I have been wanting to learn more about Google Classroom, especially since we are currently teaching in a digital environment. Wow - why did I wait so long?!! Although there is a definite learning curve involved, I really like it!

One of the tech tools which I am learning how to implement is using Google Slides to create manipulatives - thanks to my colleague Rachel Ash for introducing me to this! It is a wonderful way for students to interact with material and to manipulate it in a digital environment. Even better, it lines up perfectly with Google Classroom, because I can assign it to every student, who then can work on it and turn it back into me all within Google Classroom. On her blog, Rachel has written about how she has used manipulatives to create a My Favorites and Opinion Board assignments for students (which I too have implemented in classes with great success thanks to Rachel!). 

Just recently, I did a Movie Talk with my classes via Zoom (it was an interesting experience). As a post-reading activity, I created a manipulative for students to interact with the story in a basic way - basic, because I myself am still a novice at this. Using screenshots from the movie talk clip, I created a 5-slide manipulative where from a list of sentences, students had to drag the sentence which best described the picture. 


Rather than write out a list of directions of how to do this (it is kind of complex to write out), let me show you to do it. Once you learn the basics of creating manipulatives on Google Slides, it is not difficult. 


I hope you found this helpful, and I have a ton of ideas now about how to use manipulatives, so I hope to write about them here.