Sunday, August 25, 2019

Story Listening 2.0

This is a twist on regular Story Listening. For the record, I really do like Story Listening. I have experienced it myself as a student, and I know its power in delivering comprehensible input through primarily listening and using drawings to aid in delivering understandable messages. In addition, asking questions and circling do not get in the way of hearing a story being told. However, at the same time, I also know that when doing Story Listening, two issues arise: 
  1. Because I am not asking any questions, I do not know if/how much of the story is actually being comprehended in the target language.
  2. Students can tune out during a Story Listening, since there is nothing keeping them "accountable" for listening. Yes, students are listening which is active, but they can also be passively listening. - they are presently listening but not really taking it in, regardless of how compelling the story is.
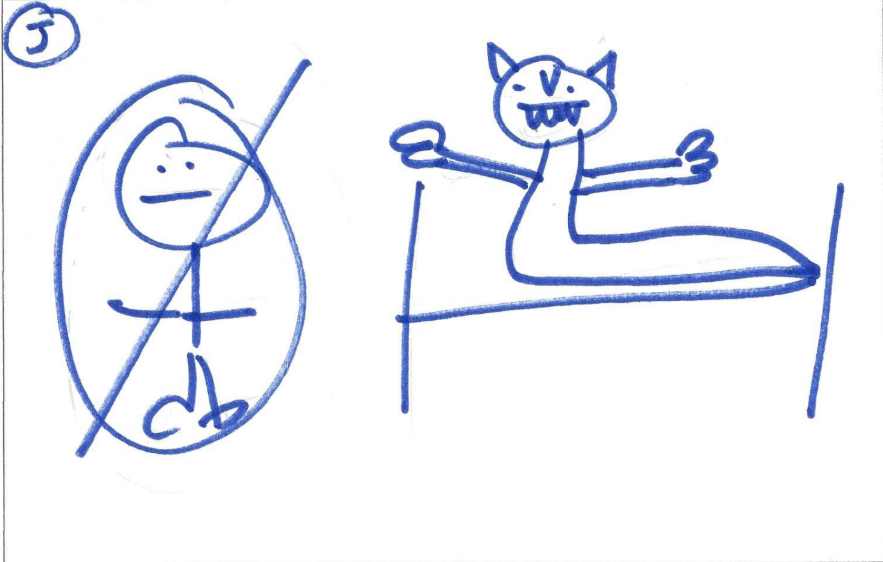
My colleague John Foulk added the following to when he does Story Listening: having students draw along with you and copy what you are drawing as you tell and draw the story. I know that some of you may say that this defeats the purpose of story listening (since learners are not solely listening), but now having done Story Listening a few times this way, I really like it. Here is why:
  1. It gives students something active to do while listening to the story and they have to pay attention.
  2. It forces me to slow down in telling the story, since I need to give time for students to draw what I am drawing.
  3. I can get in LOTS of repetitions of each sentence, because I am saying each sentence many times while I wait for students to finish drawing that sentence.
  4. Even though students are copying what I am drawing, they are making a connection with what they are hearing because they themselves are drawing pictures.
  5. Because students have their own artifact of the Story Listening, they can use it as a reference for later activities.
Here is an example of a Story Listening which I just recently did with my Latin 3's. We are starting to read Andrew Olympi's novella Perseus et Rex Malus, so I introduced the prologue with a Tier 1 embedded reading using Story Listening:


Latin
Olim erat piscator qui in insula parva habitabat. Quodam die, piscator rete in mare iecit ut capiat pisces. Cum piscator rete in navem traxisset, rete piscatoris erat vacuum. Subito, piscator aliquid in mari vidit. Piscator putavit rem esse navem. Non erat navis, sed erat arca. Quid erat in arca?

Story (English)
Once upon a time there was a fisherman, who was living on a small island. On a certain day, the fisherman threw a net into the sea in order to catch fish. When the fisherman dragged the next into the boat, the fisherman's net was empty. Suddenly, the fisherman saw something in the sea. The fisherman thought that it was a boat. It was not a boat, but it was a box. What was in the box?

Day 1
I told the story as a Story Listening activity and had students copy what I drew. Even though this was just a 7-sentence story, it took a period to complete. No circling/questioning took place. Students turned in their drawings when they were done. As the teacher, either take a picture of the drawing or draw your own copy of it.

Day 2
I projected my Story Listening picture from the day before and then told the story again, pointing and pausing at particular parts of the picture as I retold it. Again, no questioning or circling happened. 
I then asked students to summarize the story in English so that I could confirm that they understood both the drawings and what I had said in Latin. I then handed back the drawings to students and had them answer some comprehension questions in Latin at the bottom/back of the page related to the story. They could use the drawings as a reference, but they had to write down their answer in Latin.

Observations
  1. Although the questions relied heavily on the drawings, most students felt that their drawings were comprehensible enough to use to answer the questions.
  2. Many students felt that they did not have to rely on the pictures because they had heard the story repeated so many times.
  3. Those questions which students answered incorrectly told me that those were the sentences/vocabulary words which I needed to review more.
  4. I used this Story Listening to preview the vocabulary words piscator, rete, and vacuum which are rather specific words. However, because these words appeared many times in the story and I kept repeating them while they were copying my drawings and in my retell, most students acquired the words. i suppose that I could have given them a list and told them to have these words memorized, but the repetition of these words in a meaningful context connected to an illustration which they themselves drew led to subconscious acquisition.
  5. Doing a Tier 1 Story Listening of the prologue made it very easy for students to read the Tier 2 level reading.

Tuesday, August 20, 2019

Using Padlet for PQAs

I struggle with PQA's, mainly because I feel like I am asking only a few students at a time, while the rest of the class listens. Granted it may be a compelling PQA, but at the same time, I always feel like only a few students are actually involved. Here is a way in which I have introduced PQAs while using technology: Padlet.

Essentially, Padlet is a similar to online discussion boards. One can still write comments and responses, but instead they appear like Post-its (NOTE - Padlet can be used other ways such as back chats, collaborative discussions, etc). A padlet can be embedded into a webpage, blog, classroom learning management system, or projected. 

NOTE - Although Padlet says that it is a free site, it only allows you to create three Padlets for free before you have to pay. Options are to re-edit the same Padlets over and over again or to create multiple accounts with different email addresses.


Directions
  1. Create a class PQA question using Padlet. Use the "Wall" setting.
  2. Set it to "moderated status," meaning that you as the teacher will approve responses before they are posted.
  3. Copy the URL link or QR code for students to use.
  4. Project the Padlet onto a screen.
  5. Students will use the URL or QR code on their devices, which will take them to the Padlet question. If students are using the QR code, I have found that using their camera to scan the code works best, instead of a QR code reader.
  6. Students will answer the Padlet PQA question on their devices. They can respond anonymously or by their names if they are logged into Google already.
  7. You as the teacher will moderate responses before posting them for all to see.
  8. Discuss PQA responses as a class. You can begin by saying "Who responded X?" and go from there. 
Observations
  1. Because all responses can now be seen on a screen by those involved, students are more inclined to be engaged in the activity, since they see other students' responses.
  2. Having all responses on a screen gives me as a teacher a better "map" of where to go with this particular PQA, since I can see all of the answers at once.
  3. It is fun to hear students say "Who responded X?"
  4. I demonstrated this at IFLT as part of a presentation, where the question was "What popular movie from the past have you not seen?" Lots of fun answers to use for PQAs! Responses included any of the Star Wars movies, Frozen, Breakfast Club, Titanic, and Back to the Future. 

Tuesday, August 13, 2019

Running Dictation with Pictures

I absolutely love IFLT! In Georgia, students return in the first few weeks of August (summer begins around Memorial Day), so with IFLT being in mid-July, the conference totally gets me pumped up and ready to return to school. I love attending the presentations, because there is SO much which I learn from master CI teachers. This is one which I learned this summer from La Maestra Loca herself, Annabelle Williamson.

It is a twist on the traditional running dictation. A running dictation is very much like a regular dictation, except there is a running aspect, and it is like the game Telephone. Outside of the classroom or on the opposite wall (depending on the size of the room), there is paper which has the dictation sentences in the target language. Students are teamed up usually in pairs, where one student is a runner, and the other is a writer. The runner runs to the paper, tries to remember as much as possible, runs back to the writer, and dictates the sentence or as much as possible. The writer writes it down, the writer and runner then switch roles, with the writer now running and the runner now writing.

I am not a big fan of running dictations, because not every student enjoys it or sees the purpose in it. Because the sentences may not be completely comprehensible to the students, the runner does not always understand what he/she is dictating to the writer. Plus, a lot of times, it becomes a spelling activity for the writer. In addition, when I look over the dictations, many times I do not understand what was written due to spelling errors and the "telephone" effect of the sentence changing. Annabelle's idea changes it into a comprehension activity but still preserves the running aspect. 

Pre-Class Directions
  1. Create sentences in the target language from a known story, and create a document of those sentences. I used 12 sentences and found that it was a good number.
  2. Illustrate (or use screenshots) for those sentences. You will also need to label the picture as "A," "B," "C", etc. 
  3. Print up the Running Dictation pictures.
  4. Print up Running Dictation sentences - usually ½ of total number of students which you have.
Classtime
  1. Put up the pictures along a wall in a random order either in the room or outside of the classroom.
  2. Divide up class into teams of 2 or 3.
  3. Each team will need a writing surface and a writing utensil.
  4. Give the list of running dictation sentences to each team. 
  5. Explain that one person will sit with sentences and the other person will run to ONE of the pictures. It is not necessary for them to run to the pictures in order but rather to run to just one of the pictures.
  6. The person who runs will look at the picture, memorize which letter that picture is, run back to the partner, and describe the picture in English.
  7. The person with the sentences will then determine what sentence that picture is and write down the letter.
  8. Then, the two will switch roles - the writer will now become the runner, and the runner will then become the writer.
  9. Explain that they may NOT use their phones to take a picture! They again can only look at one picture at a time.
  10. When they have gotten all of the sentences, they are then to put the story in order based on the letters. 
Examples from Monster in the Closet


___________. Senex in lecto dormiebat.

___________. Puer non erat in lecto, sed monstrum erat in lecto!

___________. Quamquam senex erat iratus, in lecto ascendit.

___________. Puer non dormiebat, et timebat.

___________. Sed subito aliquid magnos sonos facit.

___________. Senex vidit puerum in armario.

___________. Puer in armario magnos sonos faciebat.

___________. Aliquid magnos sonos faciebat in armario!

___________. Cum senex magnos sonos in armario audivit, timebat.

___________. Puer respondit, “Monstrum est in armario!”
___________. Senex vidit puerum in lecto.
___________. Senex respondit, “Tempus est obdormire!”
Once you are done, put the story back in order by the above letters
______ 1. ________ 5. _________ 9.
______ 2. ________ 6. _________ 10.
______ 3. ________ 7. _________ 11.
______ 4. ________ 8. _________ 12.

Observations
  1. Wow, I liked this version of a running dictation SO much better than the traditional one.
  2. Turning the running dictation into a comprehension activity made it a higher-level thinking activity, since in a regular running dictation, if the runners did not understand what they were saying, then they were just parroting unknown words. 
  3. Even though runners are reporting back to the writers in English (I suppose they could do it in L2), there is a purpose for it, since the writer needs that information to determine which sentence it is in L2.
  4. Annabelle recommends that you as the teacher be near the pictures to clarify them for students if needed. I found this to be helpful for students, because sometimes they could not interpret my pictures.
  5. I liked that lots of higher-level collaboration happened when students were putting the story back in order according to letter. Yes, it was happening in English, but students were solely using the sentences in the target language.

Friday, August 9, 2019

Find the Disney/Pixar Character

I like to do class warmups/bellringers which involve the "forgetting hypothesis" - a warm up activity in the target language where the task becomes such the focus that students forget that they are in the target language or the target language becomes secondary. The key point is that these warmups need to be very compelling. Here is one which I created on a whim today (and I am certain that I am not the only one who does this, so I can take no credit for it. If you do this, let me know!).

It simply involves a picture of all of the Disney characters or Pixar characters and a laser pointer. This is very much like a Where's Waldo kind of activity.


Retrieved from http://www.52dazhew.com/w/585986408.html


Retrieved from  https://amhsnewspaper.com/25171/ae/the-class-of-2019-as-pixar-characters/

Directions
  1. Project the picture on the screen.
  2. Introduce it by saying in the target language, "In the picture there are very many Disney/Pixar characters." 
  3. First, ask students in the target language to find specific characters "Where is Aladdin?" "Where is Ursula?" Where is Mulan"? etc.
  4. Then ask in the target language "Who (of you) is able to find Aladdin in the picture?"
  5. Then hand the laser pointer to a student volunteer and have that student locate Aladdin in the picture.
  6. From there you can start asking questions about the character, such as "Is Aladdin a young man or old man? What is the name of the friend of Aladdin? What kind of animal is Aladdin's friend? Whom does Aladdin love? Where is the Genie? What color is the Genie?"
  7. After you do the simple "where" questions, then state "Find a character who does not have a mother," "Find a character who is an animal," "Find one of the seven dwarves, "Find a character who is evil," etc. Because there are so many different characters who match that description, there are lots of possibilities.
  8. From there, discuss the character in the target language.
Example for a Pixar character
Find Mike Wazowski. How many eyes does Mike Wazowski have? What is the name of Mike Wazowski's friend? What is the name of the little girl? What color is Sully?   

Observations
  1. I was surprised at how long this warmup actually lasted. Maybe because there was much to discuss and many options.
  2. I was also pleasantly surprised by how engaged high school students were. I do not know if it was the Where's Waldo aspect or because it was dealing with Disney/Pixar characters. I am sure that elementary school students will like this.
  3. This is definitely one which can be used many times in the future due to the number of characters and possible questions/discussions.
  4. Letting students use the laser pointer to find characters added novelty to the warmup activity.
  5. Asking students to find characters which fit particular parameters made the activity a little more higher-thinking.
  6. This is a great listening comprehension activity for students since it just requires them to listen and to "find" the character.
  7. Students want to talk about Disney/Pixar characters forever!

Tuesday, August 6, 2019

Wii Obstacle Course Brain Break

I can take absolutely no credit for this brain break - I learned this from Erica Peplinski at IFLT this past summer (in turn, she may have learned it from Annabelle Williamson). She even has her own blog post where she references this. In many ways, it is such a basic brain break, but wow, it is actually really fun - the Wii Obstacle Course. Today is the second day of school, and I thought I would try it out - it went well!

The brain break is basic: project a Wii Obstacle Course video, and have your students run the course! You as the teacher are running the course with them and yelling out commands in the target language.


The only target language TPR commands which you need are:
  • run (currite - Latin)
  • jump (salite - Latin)
  • to the left (sinistrorsum - Latin)
  • to the right (dextrorsum - Latin)
Directions
  1. Project the Wii Obstacle Course video on the screen. I use the following video, but there are SO many out there - https://www.youtube.com/watch?v=NIYK-5xbA38
  2. On the settings tab, change the playback speed. The "normal" setting goes too slow - Erica Peplinski says that the 1.5/1.75 playback speed is the best.  
  3. Have your students stand up.
  4. Tell students that they are going to run (in place) the Wii Obstacle Course with you.
  5. I start the video at 0:13. From 0:23-0:30, I have students "stretch" along with the character on screen.
  6. From 0:38-1:40, we "run" the course as a class, and yes, I am participating with them! I am also yelling out commands as we "run" - you can do the course for longer amounts of time or run different parts of the course. 
Observations
  1. Erica Peplinski does this with elementary school students, so I was a bit leery about doing this with high school students, because I thought that they would think it would be stupid. I was actually surprised by how many got into it!
  2. I had a number of students who wanted to do more levels of the obstacle course, but I was winded after running it with them and yelling out commands!
  3. You as the teacher need to ham it up with your students for this to work!
  4. When Erica demo'd this at IFLT, all of us teachers who attended her presentation had a lot of fun with this!

Sunday, July 28, 2019

Returning Back to Work

I return back to work tomorrow for pre-planning. I cannot believe that my summer vacation is over – these past two months have gone by very quickly. At the same time, it was a very full summer. I took two online graduate courses for my Ed.D. program in Instructional Technology (one course was on Digital Citizenship, and the other was on Managing Data Systems in a District – I ended up getting A’s in both!); attended two conferences (ACL Summer Institute and IFLT), where I presented at both; and managed to squeeze in a trip to Disney World before IFLT and then a trip to CA after IFLT to visit family. As packed as my summer was, in many ways, I feel like my summer vacation just started.

However, I am ready to be back to work. As I look back at the blog post which I wrote two months ago at the end of theschool year, I can sense just how physically and mentally exhausted I was when I wrote that. One of the things which I mention is that I was looking forward to the summer to have time away from students in order to recharge my batteries. Well, the time away from work and students did its job, because I certainly do feel ready for the school year.

My time at IFLT has played a HUGE part in this. Even though I had a larger role in leadership at the conference as a sub-cohort leader, coach, and presenter, I still received so much out of my time there as a participant. Seeing Linda Li teach a Mandarin class again (with me taking a part in it) showed me afresh how to deliver CI in a language class – people tease me that after Krashen, I am Linda Li’s biggest fan! Mostly, for me, however, being in an environment where I did not have to defend myself pedagogically, and where the presenters and lab teachers humbly gave of themselves to help others become better CI teachers (may I eventually display that level of humility) has so motivated me for this school year. I challenge all of you to attend a NTPRS or an IFLT, because although one can learn much about CI from conference presentations, in-services, and blogs, there is NOTHING like experiencing it in person in a weeklong, immersive environment.

So to those of you who still have a month of summer vacation left, enjoy it! I am ready to be back at school!

Saturday, July 20, 2019

So You've Just Come Back from Your 1st NTPRS/IFLT - Now What?

CI conference season has ended here in the US (it is about to begin in Agen, France), with both NTPRS and IFLT being huge successes. Perhaps the following scenario is you: This was your first time attending one of these conferences, and your mind has been totally blown away by everything which you learned and experienced. You also have a notebook full of great ideas from both presentations and lab observations which you are sifting through and trying to consolidate. You were coached for the first time in storytelling and asking questions, and as scary as it was, you made it through. You met so many dynamic people who share the same passion as you for teaching world languages and making connections with students. But now that you are home: now what?

I can totally relate to this, because after my first NTPRS conference in 2014, even though I had been implementing CI/TPRS for years, suddenly my mind had been completely expanded and blown away by everything which I had experienced during that week. Here are my suggestions to keep the ball rolling:
  1. Take time to reflect of what you just experienced. After an experience like NTPRS or IFLT, it is common to experience some degree of letdown. Reflect on your experience though: what did you go in thinking NTPRS/IFLT would be like? Where were my expectations not met? Where were my expectations exceeded? What "a-ha" moments did you have? Where do you still have some misgivings about CI? What are some strategies which I can implement in my classroom? 
  2. Find some type of CI professional learning community (PLC), either online or in person. This is key, since you cannot keep this up alone. Finding a CI PLC which meets face-to-face may be difficult depending on your area, but they do exist out there. I know of TCI Ohio and TCI Tri-States which meet on a semi-regular basis. If you cannot find something, organize one yourself! Online, there are so many CI PLC's on Facebook, such as IFLT/NTPRS/CI Teaching, and others which are language specific.
  3. Find online resources such as blogs, podcasts, and vlogs. For me, outside of in-person conferences and presentations, blogs are my lifeline for learning more about CI. The list of CI blogs on the sidebar are a few places to begin. Most importantly, do not worry if the blog is is not for "your language," because CI implementation is CI implementation regardless of the language. As a Latin teacher, I cannot tell you how much I actually get from presentations by CI Spanish and French teachers. I am always floored by how many non-Latin teachers tell me that my blog (still written with Latin teachers in mind) has greatly helped them with their classroom.
  4. Watch videos online. I had no idea that so many CI teachers out there had classroom videos - I just learned about it last week at IFLT 2019. Here are some:
    1. Annabelle Williamson (lamaestraloca)  
    2. Erica Peplinski
    3. Another channel by Erica Peplinski
    4. Tina Hardagan (CI Liftoff)
  5. Follow CI teachers on social media. My only use of social media is Twitter (I do have a Facebook page which I had to create for professional purposes but I rarely use it), but I really do enjoy reading and interacting with tweets from these teachers.
  6. Attend CI presentations at state/regional/national conferences. I know that at ACTFL, Fluency Matters always creates a list of CI-focused presentations for participants to look over. 
  7. Collaborate, collaborate, collaborate. To be honest, you cannot do this journey alone. Find others with whom you can collaborate on lessons, either in person or online.
  8. Expect to feel like a first-year teacher when implementing CI in the beginning, so take your time. I am not of the mindset of "all in or nothing" when it comes to using CI, because that is how I started out years ago and burned out after 6 weeks. I had no idea where I was going, since I did not have a strong enough foundation. My advice: take a few CI strategies/activities and run with them until you feel confident to add more. It is okay to do a hybrid CI/whatever until you feel like you can do more. 
  9. Give yourself permission to fail. Great CI teachers did not just come out of a box like that. Believe me, I still fail as a "veteran" CI teacher (note the quotation marks implying doubt) on a daily basis. I also tell myself "Well, tomorrow is another day" (didn't Scarlett O'Hara say something like that?). I have seen too many novice CI teachers experience a "failing" moment with CI, then blame CI as the reason, and then leave it all behind. 
  10. Always be hungry to learn more about CI. This week at IFLT, there was a particular session which I wanted to attend, and when I walked in, the presenter said to me, "Wow, what are you doing here? You know all of this." I think I replied something like, "That does not mean that I still don't have more to learn on the topic." And I did walk away from the session with a number of strategies which I now plan to implement!
So to all of you for whom this past NTPRS or IFLT was your first CI conference, I am so excited for all of you - here is to the journey!